Hey all. I meant to get this posted earlier but well… you know… life and laundry and working on projects and OH where does the time go? 😉 I think (I think…) I mentioned here somewhere in my ramblings that I am in a season of investing in me. I am trying to move forward with healthy habits….more activity in my life than the last year+, good friendships, good activities, and healthy eating. I think I am making progress and thought I would give you a recap of this “Investing In Me”here for Saturday Snapshot along with a tasty recipe for Weekend Cooking.
Wednesday I got a hair cut bought new tennis shoes and headed to the gym and the elliptical
Thursday I went to the Prairie Bay 2nd Thursday community night
Friday I hit the gym and the Group Power class
And now for that recipe…. this is something I picked up from one of the Librarian’s and ooh this is so good.
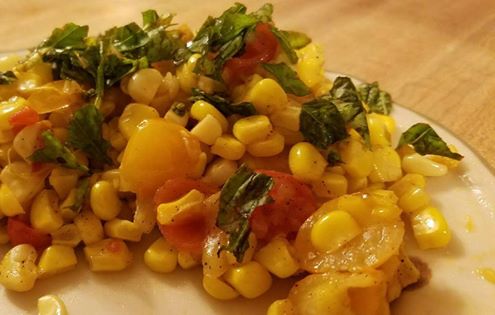
Ok… here is something TASTY!
You need:
4-6 ears of corn
1/2 onion chopped
cherry tomatoes – yellow and red – cut in half
2 TBSP lemon juice
red pepper flakes
fresh basil
2 TBS olive oil
Salt and pepper to taste
With sharp knife remove the corn kernels from the shucked corn. Heat oil over medium heat in large skillet. Add corn and onion to the skillet – shake and stir the pan for 3-5 minutes until browned. Gently add the chopped tomatoes and heat an additional 2-3 minutes until hot. Place in bowl and season with the pepper flakes and lemon juice and sprinkle the chopped basil on top. Season to taste.
**To mix it up – add an egg to the mix while cooking, or chicken or shrimp to make it more of a meal. Delicious!
That’s my week. Hope yours was eventful in positive ways. 🙂 Tomorrow… I hope to share with you about a little event coming up I like to call… Books, Burgers, and Brews. Stay tuned. 😉
Yesterday I finally went and picked up what I needed to make my raised bed garden. I had looked at the kits at Home Depot and for a small square kit the cost was $48.99. I have been staring at this kit for months. It was nothing more than wood that locked together. Yesterday I decided I would build my own. I went back to Home Depot and purchased 4 8 foot long treated boards for $3.96 each. I bought clamps to nail the comers together (45 cents each)… my weed control sheets – and my plants.
I set it all up in the yard and while listening on audio to a little Oversees by Beatriz Williams I put together the frame in about 45 minutes.
Then…. I called Al and said “bring in the dirt”. Some days it really pays to be married to an Excavator who also has a black dirt lot two properties down from our own home. 😉
I added some organic feed to the dirt and the guys helped spread it in the frame. (FYI: the guy tot he right is my son Brad.)
The cucumber frame, a gift from my friend Gail was the inspiration I needed to have a garden this year. The frame is set up so the cucumber vines will grow upward into the frame. Kind of excited to see that happen. I planted lettuce n the center of the frame, and in the other space along the back side I have tomatoes, and bell peppers, string beans, a few strawberry plants and a basil plant.
Today I am thinking about setting up a second frame for squash.
So I can also add this post to Weekend Cooking. Here is the recipe for my favorite fresh garden salsa. Every time I make this people rave.
Fresh Garden Salsa
firm tomatoes – 4 to 6
an onion
cilantro
jalapeno (optional)
3 tablespoons sugar
salt and pepper
Chop the tomatoes to desired texture of your salsa. I prefer it with chunky bits of vegetables. Chop onion, and finely chop cilantro (s much as you like) and add to a bowl with tomato. Chop in little bits of jalapeno if you wish. Season with sugar, salt and pepper. The sugar has been my secret addition, it seems to cut the sharpness a bit and adds a lot of flavor. Serve with good chips. Also delicious as a hamburger topper or on a grilled chicken breast.
Saturday morning. Saturday has always been my favorite day of the week. When I was younger it was the day of no school (and no school the next day to worry about!) and when I grew up (term used loosely) it was the day off of work, home with my kids, and no work or school the next day. Now I still like Saturdays. They have become the day that Al and I usually go out for a while in the late afternoon to a movie or for appetizers, or to some other adventure. I like that we take the time to connect when even now with me at home, we still are busy running in different directions during the week.
This past Tuesday our book club met for the review of The Life We Bury. There are many things I adore about our book club and the little extras we do really make me smile. With the protagonist being from Austin Minnesota, the home of SPAM, we had some fun. Here are a couple of recipes that you could use when you read the book, or just because you are fascinated with meat in a can like I am. 🙂 I am posting these recipes for weekend cooking.
SPLIDERS (SPAM Sliders)
You will need:
a package of Hawaiian rolls
a can of SPAM
a package of Swiss Cheese slices
butter
onion
a tasty mustard
Set over temp to 350 degrees. Open up each Hawaiian roll and lightly butter. Slice SPAM into 1/4 inch slices and place one slice on each roll. slice in half of fourths (depending on your cheese size) the Swiss cheese and place a slice on each roll on the spam. Add a little slice of onion, optional. Place all rolls in a 13 x 9 cake pan and place in oven until cheese is melted and sandwich is hot to the touch – 7 to 10 minutes. Serve hot with the mustard or mayo. Great for a movie night or any gathering.
I personally was surprised that I liked these. I have SPAM memories as a kid and I think that was the last time I ate it. SPAM today is not like SPAM was then, the jelly coating I remember around the meat that grossed me out is no longer there. The sandwiches were actually tasty and if I had not known it was SPAM I don’t think I would have guessed.
Preheat oven to 400°F. In large skillet, in butter, heat the SPAM® Classic until lightly browned. Drain well.
Whip the pimento cheese spread in a blender until smooth. Place pimento cheese spread in a large bowl. Add the SPAM® Classic (reserve about 1/3 for garnish) and diced red bell pepper.
Thoroughly wash and clean the potatoes. Cut in half and scoop out the center of each with a spoon or Parisian scoop. Mix the olive oil, salt and pepper in a bowl. Coat the potato halves with the mixture and place on a baking sheet, cut side down. Bake at 400°F for about 25 minutes or until soft when pierced with a knife.
Remove from oven and fill center with the SPAMento™ cheese mixture. Garnish the filled potatoes with the reserves SPAM® Classic, chives and a dusting of cayenne pepper, if desired. Serve immediately. Makes 48.
These were so good and I would totally make these!
As for a little Saturday Snapshot, I thought I would add a picture of our dogs this past week. Bailey(the white one) is 18 years old. Really, the miracle dog. A couple of years ago he started having seizures and then after a month they went away and we did not see him have another one until last month. It is horrible to see, but remarkably he comes out of them and goes on like nothing happened. The vet says he is not suffering in any way, he is not in pain and lives for his age a healthy lifestyle. Sammy ( the black one) has just recently taken to hanging out with Bailey a bit more. This was a cute picture of sleeping close together. Almost like Sammy is protecting him or being supportive.
I have a low key day planned…. a few reviews to write, a little audio to listen to , and possibly a little painting in the house. If all goes well, I will not have to leave the house at all today.
I do like that soooooo much.
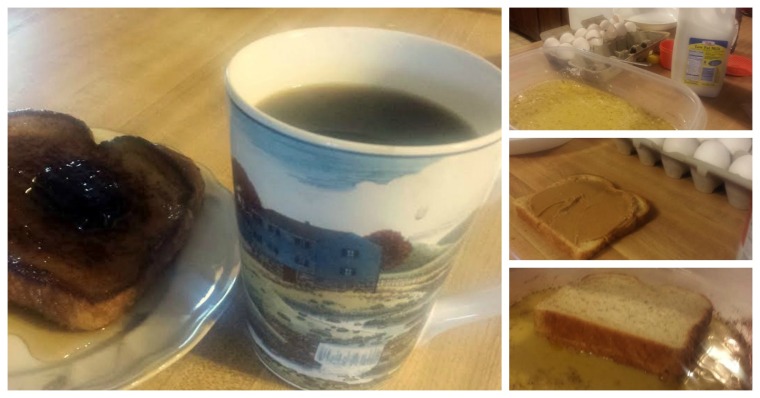
Al and I are not big breakfast eaters but a friend recently told me about a way to make french toast with peanut butter. Al loves all things peanut butter, so this morning I thought I would give it a try. Seemed like a good Weekend Cooking thing to do.
Peanut Butter French Toast
keeping it simple, use whatever your favorite french toast recipe is…. I like to put vanilla, cinnamon, and powdered sugar in my mix
Mix up your french toast batter
Take your bread of choice and put a layer of smooth peanut butter on it.
Add another slice of bread to the top like a peanut butter sandwich
Dip the sandwich in your french toast batter and let both sides get soaked in batter
Place sandwich in a heated fry pan with a little melted butter
cook 2 to 3 minutes until bottom side is done (golden brown) then flip over an repeat on other side.
Serve immediately with maple syrup.
Verdict: It was good, I am not as big of a peanut butter fan as m husband. If I were to do it again I may consider adding sliced banana in the sandwich.
The weekend is here! Yet… I don’t feel in my usual relaxed weekend mode. After I write this post I am going to go and change the window out at the library, then list some printers we no longer use on Craig’s List, work on securing authors for Wine and Words, and start to prep our Friends Annual meeting agenda that is Monday evening. Hopefully later this afternoon Al and I will meet up with our son Brad to eat and catch up.
Speaking of food…
One of the great things about vacation is of course, all the delicious food and no cooking it! We recently returned from Cancun, a trip we took to Moon Palace, an all inclusive resort with friends. I am normally a big picture taker, but not so much this time so relying on those that were with us to come up with great pics – however… I did grab some food pics. You know that crazy person that is in a restaurant and whips out their camera to take a picture of their food? Say hi next time, that is me. 😉
Above: By the pools there were several places you could grab a quick bite to eat. They had everything from chicken wings to burgers…. salads to cookies…. nachos to hot dogs on the grill. And yes, they had pizza. We had the pizza a couple of times during the week we were there. They made it in front of you and cooked it in this cool brick oven. The pizzas cooked in about two minutes.
Below: One of the days a few of our group went into Cancun to see the shops. They had beautiful items for sale but I am not a big fan of the hustling and the pushiness of the vendors. Still, it was nice to say that I did go into Cancun. Before we headed back to the resort we grabbed a bite in a Mexican restaurant in the area. The food was tasty!
Below: My husband Al, and a couple of the other guys, Ray and Jim, went fishing one morning. They caught quite a few fish in the few hours they were out including this big Mahi Mahi which the chefs at the resort cooked for us that evening for our dinner. It was a great experience for the guys and it was fun to taste the fresh fish they caught.
Ahhh…. a post about one of my favorite subjects. Well, two really….. books and my book club “The AMAZING Bookies”… ok, they are really just called the Bookies but you know… I love them. I would take a punch for them.
A couple of weeks ago we met at a restaurant to discuss the book Delicious by Ruth Reichl. I had read and reviewed this book two years ago and LOVED it then and was so excited to have my book club choose it for our November read. Ruth Reicht used to be a food critic for the New York Times. She writes about this in the highly recommended read, Garlic and Sapphires (another one my book club read and boy did we have fin with that review!)
Delicious is Ruth Reichl’s first dab into fiction. It is about a young girl who takes a job at a magazine called Delicious. When the magazine goes under, she is kept on the payroll for an additional year to handle the guarantee hot line that Delicious offered to its readers. Yet Delicious is so much more than that…. it is about that – it is about taste, and smell, hidden rooms, secret recipes, relationships, friendships, and more.
The Bookies the night of our review. We were only missing one. We had to take a couple of pictures since I asked our waitress several times if she would take a group picture of us and – well… we did it ourselves. 🙂
We rarely go out to restaurants any more. We usually meet in homes due to the size of our group and that we do not want our discussion to be a distraction to other diners (ie… loud voices, laughter, difference of opinions, topics of discussion depending on the book….) however this restaurant had a large private room that we could close the door to. The food was well…. Delicious, which is what we were going for. I had a mushroom pasta that made me want to try to duplicate it at home:
Another sweet thing about this room that we were in is that they hang books from the ceiling. SOOOOO COOL. I thought I had taken a good picture of the ceiling but I guess I did not, however in the below pic you can see some of them hanging.
To take this discussion to the next level we all shared a recipe that was a favorite. We were suppose to make copies for everyone and share why that recipe had special meaning to each of us. I LOVED this part of our discussion. It was a common theme as we went around the room that each of the recipes had connections to family somehow – either a tradition, a wedding or a funeral…. there was something special about each related to the food. I shared my white chicken chili recipe which was one of Justin’s favorites. If he was coming into town and I asked him what he would like for dinner, this one was almost always on his list.
Over all, the Bookies game Delicious a slightly above average rating. Some of us (like me!) loved it. A few found it too spread out – several story lines between the hidden messages, underground railroad, etc… left them feeling there was too much going on, some found it predictable. No matter what we each thought, the book lead to a wonderful discussion.
What Makes Delicious A Good Book Club Choice?
There is much to discussion in Delicious. If your group enjoys food that goes with the book, this is a winner. The food described in this book is so mouth-watering (the cake discussed will be at our Bookies Christmas party this year).
Between sharing recipes, talking about how the book mirrors Ruth Reichl’s real life (yes some of the things in this book actually did happen to the author!), the underground railroad connection, your group will be able to have a lively discussion.
We always enjoy taking our reads to the next level through excellent discussion not only on book, but author as well, often food to go with what we read, and occasionally (my favorites) we dress up.
When we chose Gone With The Wind for our Annual Classic Read I was so excited about the possibilities for dressing the era. When the buzz started with the girls saying they would make curtain dresses, having never read the book before I was thrilled with their enthusiasm…. making dresses! Way to go Bookies!!!
And then…
I was sent a link to the Carol Burnett spoof on the book…
Ahhh….. what exactly were the Bookies going to do?
There was a little buzz on our Facebook page. They were havig trouble finding used curtains for their dresses. I went to a Halloween shop and found mine …. it was called Goth Vampire but I figured if Scarlett could be who she was… she certainly could also be goth.
So book review night comes. I had it at my house, converted to the Plantation Tara for the evening. And as the girls entered… I was impressed with their creativity..
The Bookies…
do not disappoint.
As you can see in the picture… several made the curtain dress! Kathy (far right in white) even had the curtain rod in hers! Between using old curtains, buying curtains, dressing in an ere looking dress, and being creative….
the Bookies take on Gone With The Wind like pro’s! You will notice up front we have a Mammy… and another surprise you can not quite see in this picture, but you will soon!
There she is… in the back to the left with a halo…. yes Gone With The Wind fans…. Lori dressed up as….
Yup. God’s nightgown.
The exclamation that Scarlett would frequently say throughout the book when she was frustrated. The first time in Bookie history that someone dressed as an exclamation. Nicely played Lori…
nicely played.
Laura, with the help of her mother, went all out and sewed up this cute little curtain number from new curtains. I told her she could wear this next year to our Gatsby party as well!
Of course… it wouldn’t be a Bookies book review without great food….
We had corn pone, Frankly My Dear I Don’t Give A Ham sandwiches, Butler Balls, shrimp creole,fried chicken, brownies, and sweet potato pie (recipe below) and a Scarlett OHara drink (recipe below).
We had an excellent discussion on the book. There is so much to talk about in Gone With The Wind! We all agreed that Ashley was NOT a catch. We discussed Scarlett’s relationships with her different husbands as well as with her children. She was indeed… a unique individual.
We also had good discussion over the author Margaret Mitchell… kudos to her for creating such a protagonist as Scarlett… what an unusual perspective for the times…. this headstrong woman who was not a nurturing mother or wife but instead always looking for the best way to support herself and her ambitions.
It was interesting also to hear the difference of thoughts from those in the group who had read the book before (very few actually), and those who had seen the movie, to those of us like myself that had not done either.
For a classic, the overall consensus was an average read AND not to bad for a classic rating – BELIEVE ME. A few of us, myself included, rated the book a 5 which is our top of our rating scale. See my personal review here.
Why Does Gone With The Wind make for a good book club read?
Gone With The Wind is indeed vast with pages, but worth the efforts for book clubs. The option to read or listen to on audio makes for a wide variety of discussion on both. There is much to discuss as a group from the civil war, to the reasons this is a banned book, to Scarlett herself as well as her relationships with others. AND the little extras you can do to make your discussion even deeper.
Boil sweet potato whole in skin for 40 to 50 minutes, or until done. Run cold water over the sweet potato, and remove the skin.
Break apart sweet potato in a bowl. Add butter, and mix well with mixer. Stir in sugar, milk, eggs, nutmeg, cinnamon and vanilla. Beat on medium speed until mixture is smooth. Pour filling into an unbaked pie crust.
Bake at 350 degrees F (175 degrees C) for 55 to 60 minutes, or until knife inserted in center comes out clean. Pie will puff up like a souffle, and then will sink down as it cools. ( as seen at All Recipes.com)
I woke up crying this morning. That may be a bit TMI… but I do want to keep it real here and this site is not only my bookish release – it is also my record of what life is now like in this after Justin world.
With that said – the word for the week is CANNING.
With a couple of people offering me up the tomatoes they were not going to use themselves, I have found that the process of canning keeps my mind busy, and while doing so, I am listening to Gone With The Wind for book club – so double duty.
Today I thought I would share with you for Weekend Cooking and Saturday Snapshot, a look into my canning world – and a recipe bonus.
I inherited a lot of tomatoes.
And more than what is pictures as I went back to this one ladies house two times with 4 totes and filled them all each time. So I have been making salsa (red and green), spaghetti sauce, pizza sauce, sliced green tomatoes for friend green tomatoes, stewed tomatoes, basil tomato sauce… and enough cucumbers to make 12 jars of pickles.
One of my favorite recipes is the one for salsa. I LOVE salsa. I love to make it fresh but I have discovered a salsa recipe that Al and I both devour with satisfaction. And that is what I will share with you today:
You will need:
14 cups of cored and peeled and then chopped up tomatoes
5 cups of dices onion
5 cups of diced green pepper
1/4 cup of fresh diced jalapeno peppers
5 Tablespoons of cumin (I use the hotter one I find in our local grocery)
1/4 cup of Cilantro
1/4 cup of sugar
3 Tablespoons salt
fresh ground pepper to taste
1 cup cider vinegar
1/2 cup lemon juice
Still all of this together and simmer in a large pot around 20 minutes. Process into hot sanitized pint jars with a 1 teaspoon of lemon juice in the bottom of each jar. Seal and place in a large boiling hot water canner for 15 minutes. Be sure that all lids seal before storing (I leave them on my counter for a day to check them.) Delicious with chips or over chicken. Also makes a lovely gift.
Today… I continue. I have tomatoes ready to make another batch of the basil tomato sauce, and apples ready to start apple butter. Later today I am going to try my had at home made siracha which involved my peppers witting in a vinegar bath overnight. We will see….
On another note, Banned Book Week starts tomorrow… CRAZY how fast that came up. For those of you signed up to participate I will send out an email today, for the rest of you – its not to late to sign and be sure to participate too as there will be giveaways and a lot of fun!
My good friend over at Beth Fish Reads hosts this wonderful weekly meme where we can share what we are cooking. Many times I have found a new recipe to try or even planned right then and there that what I read about was what I was making for dinner.
Today I thought I would share with you the fall tradition I have of making Apple Butter from our apple trees. As there are lots of pictures, I am also placing this post under Saturday Snapshot (another excellent meme). The main connection I have to the whole process is this:
I am the proud owner of my Great Grandmother’s chinois sieve and pestle. This really is the selling point for making apple butter at home (well… that and all the apples). I love taking these items out of storage.
And… I do have apple trees.
Tree #1Tree #2
Tree #3
It is Tree #3 I have been working off of. While I am waiting for the first frost before I pick the apples, Tree #3 is my crazy tree who never has an off year, is ALWAYS loaded down with apples and breaks it’s branches. And currently had dropped a lot of apples to the ground so I have been snatching them up.
So I have been making apple butter. I like it because it is fairly simple – no need to peel, seed, etc… here is my basic recipe handed down and perhaps tweaked a little be me….
You will need…
canning jars – small jelly style up to a pint
canning lids and rings
large pot (canners are good)
apples (I use from our trees but any hard apple will do – Granny Smith apples work great!)
apple cider vinegar
sugar
cinnamon
cloves
all spice
vanilla (optional)
You will need 4 pounds of apples per batch. I usually double the batches. Cut off any bad spots on your apples and then cut in quarters and don’t worry about seeds, stem, core. Weigh your apples and when you have the right amount bring to the stove and place in a large pot (the big canners work great for this).
I have been cutting the apples outside because it has been so nice out. I use my picnic table, the big canner and my Great Grandmothers scale.
Once apples are in the large pot, add two cups of water and one cup of apple cider vinegar to every 4 pounds of apples. Cover and bring to boil for twenty minutes.
After apples have cooked soft, with a slotted spoon, scoop the apples out of the liquid and place the sieve over a pot or bowl and then put apples into the *sieve. Use the pestle to squish the good sauce out of the apples and keep doing this until all that remains in the sieve is the skin, seeds, and stems. Continue until you have done this with all the cooked apples. Then take a spatula and grab the excess sauce off the outside of the sieve.
Add to your apples – 1/2 -3/4 cup sugar to each cup of apples. I kind of do this to taste and you should too – some people like a sweeter product than others. I am closer to the 1/2 cup sugar to each cup of apple sauce, sometimes less. Add 2 tablespoons cinnamon, 1 teaspoon all spice, 1 teaspoon, cloves, and 2 tablespoons vanilla to each 4 pound batch you are making. Stir all of this well.
Over med low heat start to cook your apples using a wide bottomed pan. The point of the cooking is to evaporate all the excess moisture our of the apples so the wider the pan bottom the faster this processes can be. I use two large deep fry pans. Cook this way for 1/2 to 2 hours, stirring often until apples are thick and if you place some on spoon and put in freezer for a minute the sauce does not get runny.
Sterilize your jars. I put mine in a clean sink and pour hot boiling water over them.
Scoop apple butter (yup…. it is apple butter now!) into the jars leaving 1/4 inch space to the top. Place a lid and ring over each jar. and leave to cool on a towel on your counter top. You should hear the lids pop as they seal.
I know there are easier ways to make apple butter these days, but using the same process that my Great Grandmother used and knowing that her hands used that pestle as did my own mother brings me a little happiness.
Apple butter is excellent on toast, and I like it with cottage cheese. It is also good on pork chops and makes for a wonderful gift.
Just a reminder.. Banned Book Week starts September 27th and we have a lot of fun lined up for this annual event. Click on the meme pic or the link above to find out more!
My good friend over at Beth Fish Reads hosts this weekly meme for all of us to share what we are cooking and how to make it for yourself. It is a great meme and I have picked up some tasty recipes over the years.
This week I made something a little different… It was easy, healthy….
and quite honestly for the dogs.
Yes, I made dog treats.
I had mentioned earlier this week that Mater had to go to the vet and had surgery. While waiting in the lobby I was flipping through a magazine (vets have pet magazines as opposed to people magazines at our doctors, I find that awesome). While doing this I found a recipe that was easy to make, low cost, and good for your dogs health and fur.
Salmon Carrot Bone Oats
(originally published in Everyday Dog February 2015)
* a few tweets made by me from the original recipe
1 1/4 cup flour
1/2 cup quick oats
1/2 cup canned salmon
1/2 cup carrot (grated or shredded)
1 egg
2 tsp oil
3/4 cup water
In a medium/large size bowl add the flour, oats, salmon, and carrot and stir together. Add the egg, oil, and water and mix well. (*if dough is to stiff add water slowly until you have a workable dough)
Preheat oven to 250. Roll dough in to 2 inch size balls and place on a cookie sheet and bake for 3 hours. (Yes I did this and the cookie never became hard, just perfectly baked). It is said that you can also do this at 350 degrees and check the cookies after an hour in the oven. You are looking for them to be dried out, a biscuit like quality.
Results: The dogs really enjoy them. I found these to be easy to make and cost effective. The only item that cost a bit was the salmon and even that wasn’t bad, I paid $2.19 for the canned salmon and used it is double the recipe.I store them in a Rubbermaid seal-able container. Overall, these are a healthy treat cost less that $4 to make a double batch and made about 40 cookies.
Stop by Beth Fish Reads to see what other people are cooking this weekend. More than likely, they are making people food. 😉